


Hello guys, today in this blog article we are going to explore & see how we can configure WordPress as Headless CMS using REST API with Nextjs. This going to be a long post, please bear with me.
As we move through future articles in the series, we’ll be covering a lot of moving parts to round out the entire process, including:
Starting a blog using Next.js
using WordPress as a Headless CMS (REST API) with Next.js
how to make Pagination with Next.js
here, I am assuming that you all know how to use Next.js, if you want to know & learn about Next.js, please click here
to integrate/configure WordPress CMS into Next.js, we are going to use REST API which is made available by WordPress, here we are not going to use GraphQL.
before exploring this article, if you wanted to explore WordPress REST API Documentation, click here, and for this article/blog we’re going to use this
before running the below command, please make sure that the latest version of Node.js is installed (v16 +) and also confirm the create-next-app is also installed, which can be confirmed using, create-next-app -V, and then you can create a new Next.js app by using the below command
npx create-next-app wp-demo
Once finished, you’ll receive a message saying everything’s been successful and then you will be given a few commands to build, run, and start our new app.
Let’s check everything’s working first by typing the following commands in your terminal:
cd wp-demo
and finally:
npm run dev
or
yarn dev
What you’ll see is a blazing fast site build, followed by a message that your site has successfully been started at http://localhost:3000. Open that address in a browser of your choosing and you should see the following page.
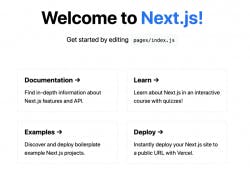
if you get this page means you have successfully built the Next.js website
we are going to fetch the Posts from WordPress using fetch() the method.
Files to Edit
now open /pages/index.js file and delete all the boilerplate codes except <Head></Head>
now we will call the WordPress REST API in order to fetch the Blog Posts from the WordPress.
here we can use useEffect() to fetch the WordPress Blog Posts, but we’ll use the feature & advantage of Next.js which helps for better SEO, so we will use getServerSideProps(). and getServerSideProps() can only be used on page-based files only not in components. and below is the code snippet to fetch the posts.
export const getServerSideProps = async () => { const variableName = await fetch('your-wp-domain-url.com/wp-json/wp/v2/posts?..) const variableNameTwo = await variableName.json()
return { props: { variableNameTwo } } }
export default function Home (props) { const { variableNameTwo, ...other } = props; return ( ...
<ComponentName {...other} variableNameTwo={variableNameTwo} /> ) }
or you can use useEffect() also
const PageName = () => { const [ variableNameTwo, setVariableNameTwo] = useState([]);
useEffect(() => { setLoading(true); const fetchBlogData = async () => { const blgData = await fetch( 'your-wp-domain-url.com/wp-json/wp/v2/posts?.. ); const blgJsnData = await blgData.json(); setBlogData(blgJsnData); setLoading(false); };
fetchBlogData(); }, []);
return (
) }
export default PageName;
here, variableNameTwo will be an array that will contain all the post data.
let me describe/explain to you what parameters I’ve passed along with the URL to get the blog posts from WordPress.
_embed – this parameter is used to retrieve the featured images, Author Details, tags, categories, etc. along with the blog post.
order – we can retrieve the Blog posts based on ascending/descending order, by default it’s in desc order.
per_page – we can define how many posts we need to retrieve in 1 page, by default it’s 10, and the maximum number of posts per page is 100.
status – it is used to retrieve the blog posts based on status, e.g. publish or draft, by default it’s publish.
for more parameters we can pass with posts, please refer here
now in componentName, you can iterate on the array and display the required blog data as per your design. and to open the particular single blog on the new page below is the code snippet
<Link href={/blog/${mapName['slug']}} passHref> Read More
now when you click on the Read More button/link, a new page will open with a particular/single blog post, we have to run the below code snippet in order to get the particular/single blog post details.
export const getServerSideProps = async (context) => { const { slug } = context.params;
const variableName = await fetch(https://your-wordpress-website-url/wp-json/wp/v2/posts?_embed&slug=${slug}); const variableNameTwo = await variabeName.json();
if (variableNameTwo.length === 0) { return { redirect : { destination : '/404', permanent : false } }; }
return { props : { variableNameTwo } }; };
now you can access the variableNameTwo, inside the page as props, and remember that variableNameTwo will be an array.
below are the code snippets which is used to retrieve the title, description, image, and slug
data['title']['rendered']
above syntax is used to retrieve/get the blog title
<div dangerouslySetInnerHTML={{ __html: data['content']['rendered'] }} />
the above code snippet will display the blog content (e.g. description) on the page UI.
<img src={data['_embedded']['wp:featuredmedia'][0]['source_url']} alt={data['title']['rendered']} />
to access the featured image from WordPress, it can be accessed with the above code snippet.
{data['date']}
with the above code snippet, you can get the date when the blog post was published.
{data['_embedded']['author'][0]['name']}
with the above code snippet, you can get the name of the author, who wrote this blog post.
{data['_embedded']['wp:term'][0][0]['name']}
with the above code snippet, you can get the name of the category.
{data['_embedded']['wp:term'][1].map((tag) => { return ( <Fragment key={tag['name']}>
{tag['name']}
with the above code snippet, you have to iterate/loop on the [‘wp:term’][1] in order to get all the tags.
to know more about me or want to read relevant & more blogs, find me on my website